Deploying Microsoft Office 2016: Building the Task Sequence in System Center Configuration Manager for Reliable Deployment

It’s time to wrap up this series on Office 2016 deployment. We’ve built several prerequisite application packages, some Global Conditions, and the Office application package itself. Because Microsoft recommends not installing multiple versions of Office together and because Office Setup cannot remove all components of previous versions, we built a Configuration Manager package with all of the OffScrub scripts from Microsoft Product Support Services to allow reliable removal of previous versions.

The application package we built last time brought everything together except the Offscrub package. That application package is useful for an operating system deployment task sequence or to device collections where you know that no member device has a version of Office already installed. To have reliable installations of Office 2016 with no previous versions, we need to add one more component: a task sequence.

Building the Configuration Manager Task Sequence

Create a custom task sequence. Do not specify a boot image. Assuming that you are installing multiple Office programs, here is a suggested name and description:

Name Office Family 2016 (32-bit) [Remove existing]
Description Removes previous versions of Office programs and then installs Office, Project, and Visio 2016 and all of their prerequisites.

You will have to give some careful thought to the content of these fields; both of them have rather short length limitations that prevent more accurate descriptions than what is shown above.

Right-click the newly-created task sequence, and click Edit. Now I will describe each step you should add to the task sequence.

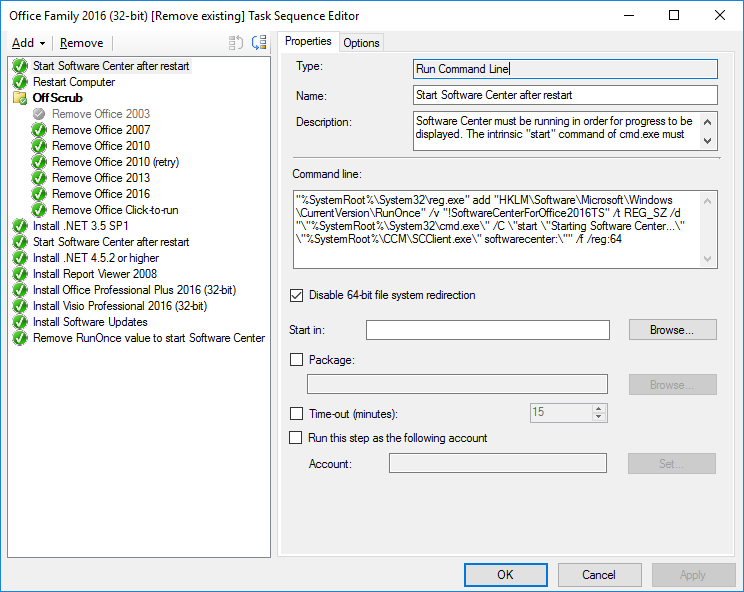
Step 1: Start Software Center after restart

Type Run Command Line
Name Start Software Center after restart
Description Software Center must be running in order for progress to be displayed. The intrinsic “start” command of cmd.exe must be used; otherwise, Software Center will start on sign-in, but the desktop will not be loaded until it is closed.
Command line "%SystemRoot%\System32\reg.exe" add "HKLM\Software\Microsoft\Windows\CurrentVersion\RunOnce" /v "!SoftwareCenterForOffice2016TS" /t REG_SZ /d "\"%SystemRoot%\System32\cmd.exe\" /C \"start \"Starting Software Center...\" \"%SystemRoot%\CCM\SCClient.exe\" softwarecenter:\"" /f /reg:64
Disable 64-bit file system redirection Checked

This step ensures that Software Center is restarted automatically the next time someone signs in. This is important to show status to the user in case the task sequence is being run. The exclamation point prefix on the RunOnce registry value defers deletion of the value until after the command has completed successfully. That means that the command will not be deleted if it fails, and it will therefore by tried again the next time the RunOnce key is evaluated.

Step 2: Restart the computer

Type Restart Computer
Name Restart Computer
Description The “/Force” switch is being passed to all of the OffScrub scripts. This kills running Office programs and will thus cause data loss of any unsaved files. Restart to prevent this from happening.
Specify what to run after restart The currently installed default operating system
Notify the user before restarting Checked
Notification message Microsoft Office 2016 will be installed, and old versions of Office will be removed. The computer must restart to continue. Please save your work and close all programs. This upgrade process requires multiple restarts. You may sign into the computer after it restarts in order to view progress, but do not attempt use any programs until this process is complete.

As the description says, the OffScrub scripts will all forcibly terminate any running Office application without prompting the user to save data. If a user runs this task sequence manually, this delayed restart step informs the user what is happening and gives him or her time to save data.

Step 3: Remove old versions of Office

Type Group
Name OffScrub
Description Remove old versions of Microsoft Office.

We’ll call all of the OffScrub scripts from inside this group.

Step 3a: Remove Office 2003

Type Install Package
Name Remove Office 2003
Description Runs OffScrub03 script from Microsoft Support.
Install a single software package Selected
Package Microsoft OffScrub
Program OffScrub03

Step 3b: Remove Office 2007

Add a step to remove Office 2007 just like the one for Office 2003, replacing property values as appropriate.

Steps 3c and 3d: Remove Office 2010

Add a step to remove Office 2010 just like the one for Office 2003, replacing property values as appropriate. Then, make a copy of it so that there are two identical steps that remove Office 2010. Make the following changes:

  • Change the description of the first one to:
    Runs OffScrub10 script from Microsoft Support and continues on errors. OffScrub10 uses non-zero exit codes for informational reporting, which are interpreted by ConfigMgr to be errors.
  • Set the first one to Continue on error (on the Options tab).
  • Change the name of the second one to:
    Remove Office 2010 (retry).
  • Change the description of the second one to:
    Runs OffScrub10 script from Microsoft Support again and fails on errors. OffScrub10 uses non-zero exit codes for informational reporting, which are interpreted by ConfigMgr to be errors.
  • Add a condition to the second one (on the Options tab):
    Task Sequence Variable _SMSTSLastActionSucceeded equals “false”

Microsoft was consistent in the return values for all of the OffScrub scripts except for the one for Office 2010. In this one, some non-error conditions are reported back via the script’s exit code, and unfortunately there is no way to specify success values for ConfigMgr package programs. The approach I chose was to run the script once ignoring errors, and then run it again, if needed, failing on errors (thus causing the task sequence to stop).

If the first run of the script is successful and returns 0 (zero), the task sequence will record “true” in the _SMSTSLastActionSucceeded variable, and the second run of the script will be skipped due to the condition.

If the first run of the script is successful and returns a non-zero informational value, the task sequence will record “false” in the _SMSTSLastActionSucceeded variable, and the second run of the script will be executed, but it will have nothing to do and so will finish quickly, returning 0 (zero) because it has no special information to report.

If the first run of the script fails and returns a non-zero failure value, the task sequence will record “false” in the _SMSTSLastActionSucceeded variable, and the second run of the script will be executed. Assuming the script runs into the same problem that it did during the previous try, it will fail again, but this time the task sequence engine will see the failure and stop the task sequence.

Step 3e: Remove Office 2013

Add a step to remove Office 2013 just like the one for Office 2003, replacing property values as appropriate.

Step 3f: Remove Office 2016

Add a step to remove Office 2016 just like the one for Office 2003, replacing property values as appropriate.

Step 3g: Remove Office Click-to-run

Add a step to remove Office Click-to-run just like the one for Office 2003, replacing property values as appropriate.


Back outside of the OffScrub group, we’re ready to start installing software. The instructions below install all of the Office prerequisites as separate task sequence steps. This provides better feedback to the user as to what is happening and should make it easier to follow along in the logs if something goes awry.

New Install Application steps have a Retry this step if computer unexpectedly restarts checkbox checked and the number of times to retry set to 2 on the options tab. Leave these default settings for all Install Application steps added below.

Step 4: Install .NET 3.5 SP1

Type Install Application
Name Install .NET 3.5 SP1
Description Leave blank.
Install the following applications Add the .NET Framework 3.5 SP1 application package that we created earlier as the only item in the list.

Step 5: Start Software Center after restart

Copy the Start Software Center after restart step from the top of the task sequence and paste it here.

In my testing, installing the .NET Framework 4.x required a restart for completion, so we’ll set up Software Center to start again after that installation and restart is complete. At the very end of the task sequence, we’ll delete this registry value if it is still present. This would be the case if the computer already had .NET 4.5.2 or higher installed prior to running this task sequence.

Step 6: Install .NET 4.5.2 or higher

Type Install Application
Name Install .NET 4.5.2 or higher
Description Leave blank.
Install the following applications Add the .NET Framework 4.5.2 or higher application package that we created earlier as the only item in the list.

Step 7: Install Report Viewer 2008

Type Install Application
Name Install Report Viewer 2008
Description Microsoft Report Viewer 2008 is required for Database Compare 2016, which is a companion program to Access 2016.
Install the following applications Add the Microsoft Report Viewer Redistributable 2008 (KB971119) application package that we created earlier as the only item in the list.

Step 8: Install Office Professional Plus 2016 (32-bit)

Type Install Application
Name Install .NET 3.5 SP1
Description Leave blank.
Install the following applications Add the Microsoft Office Professional Plus 2016 (32-bit) application package that we created earlier as the only item in the list.

Steps 9 and 10: Install Visio and Project

Add Install Application steps for the Visio and Project application packages that we created earlier. These will be much like the Office installation step above.

Step 11: Install Software Updates

Type Install Software Updates
Name Install Software Updates
Description Leave blank.
Install software updates assigned to the destination computer All Software Updates

Step 12: Remove RunOnce value to start Software Center

Properties tab
Type Run Command Line
Name Remove RunOnce value to start Software Center
Description If the OS was fully patched (including having .NET 4.5.2 or higher installed) prior to running this task sequence, no restarts may have been triggered since the last “Start Software Center after restart” step, so remove the registry value if it is present.
Command line "%SystemRoot%\System32\reg.exe" delete "HKLM\Software\Microsoft\Windows\CurrentVersion\RunOnce" /v "!SoftwareCenterForOffice2016TS" /f /reg:64
Disable 64-bit file system redirection Checked
Options tab
Success codes 0 1

That’s the number zero, followed by a space, followed by the number one.

Continue on error Checked

The description field contents pretty much explains what this is doing. Note the changes to the Options tab, though. If reg.exe deletes the value successfully, it returns 0 (zero). If the value is not there, though, it returns 1. Since we just want to run the command and consider it successful no matter what, we need to set 0 and 1 as valid success codes as shown above. As insurance that some other unknown error condition won’t cause the task sequence to register as a failure, we also check the Continue on error box.

Advice

That’s it! Running this task sequence will ensure that target machines have exactly one version of Microsoft Office—Office 2016—and that all of its prerequisites are present. You will want to think carefully about how you deploy it. If your users are conditioned to sign out at the end of each work day, you may be able to deploy the task sequence as required for a specific time overnight without many problems. If users typically leave their computers turned on and signed in, with unsaved data open in various applications, you may want to just deploy the task sequence as “Available”, and then notify users via e-mail that they can run the task sequence themselves from Software Center. Running it manually will give users the warning that the computer will be restarted and give them time to save their data.

Be advised that in my testing, this task sequence took a minimum of 30 minutes to run and typically took quite a bit longer; just installing the updates takes a while. If users will run the task sequence themselves, I suggest advising them to begin the task sequence before going to lunch or before leaving for the day. If you know that your environment doesn’t have certain versions of Office, you could disable the corresponding OffScrub step(s) in order to save time. For example, I don’t think there are any Office 2003 installations remaining in my organization, so I disabled that step. Further, we no longer have a site license for Project, so I removed it. With those changes, here is what my task sequence looks like this:

Picture of Task Sequence Editor window


Deploying Microsoft Office 2016: Building the Application Package in System Center Configuration Manager

It’s been a long process, but it’s finally time to build the Application objects in System Center Configuration Manager for Microsoft Office and its sibling programs. There is just one bit of housekeeping to take care of first. One of my rules for a Configuration Manager Application is that it must have an uninstallation command. This provides Software Center with the ability to remove it, thus giving users an “app store” experience. That takes a little bit of work, and so we’ll do that first. Then we’ll walk through the Application-building process. Next time, we’ll use our new Applications along with our Offscrub package to build a task sequence for deployment.

Silent Uninstallation

As we did in the Customizing Setup post, we will consult the Office 2013 documentation to help us. The Setup command-line options reference for Office 2013 on TechNet has a helpful section describing uninstallation. Basically we need to use a custom config.xml file to instruct the setup program to perform a quiet uninstallation. This documentation doesn’t mention it, but because Configuration Manager Applications must not initiate a reboot, I’m going to add the SETUP_REBOOT property with a value of “Never” in order to be certain that the uninstallation process will not restart the computer unexpectedly. (You may recall that we added this property to the customization file for installation, but we don’t have a customization file for uninstallation.) To do that, we’ll use the Setting element of config.xml.

Open your favorite text editor, and save the following text as UTF-8. I named my file “Config-ProPlus2016-Silent-Uninstall-2016-02-22.xml” in the root of my deployment folder: \\fileserver\software$\Microsoft\Office Professional Plus 2016 (32-bit).

You can quickly create the needed files for other products in the Office family by changing the Product attribute of the Configuration element. Open the config.xml file located inside each product’s folder to obtain the appropriate value for that product. For example, for Visio Professional, look at the vispro.ww\config.xml file, and find that the Product attribute must be “VisPro”.

Warning: Don’t change the existing config.xml files in the installation source. Office Setup uses these files during installation, so our uninstallation settings must be saved elsewhere.

Building the Configuration Manager Application

Building the Configuration Manager Application for Office is a two-pass process. First, we’ll point ConfigMgr to the product MSI so that as many properties as possible populate automatically. Then we’ll go back and edit the Application to add our uninstallation command, prerequisite applications, and system requirements.

  1. In Configuration Manager Console, in the Software Library workspace, navigate to Overview > Application Management > Applications.
  2. In the ribbon, click Create Application. The Application Wizard will appear.
  3. On the General – Specify settings for this application page, select Automatically detect information about this application from installation files, and choose Windows Installer (*.msi file) as the Type.
  4. In the Location box, type the network path to the specific product’s MSI file under your installation source. For example, the MSI file for 32-bit Office Professional Plus is located in the proplus.ww folder. In my installation source, it is
  5. Click Next, and then click Next again to begin customization.
  6. Fill out the Specify information about this application page. This is where we supply Office Setup with our Office Customization Tool settings as well as our uninstallation settings. Although Office has a Windows Installer-based setup process, using setup.exe is required. Run setup /? to see all of the options. Keeping in mind that our example is 32-bit Office Professional Plus 2016, here are the settings.
    Name Microsoft Office Professional Plus 2016 (32-bit)
    Publisher Microsoft
    Software version 2016 (32-bit)
    Installation program setup.exe /adminfile "OCT-ProPlus2016-x86-Silent-Install-2016-02-22.MSP" /config "proplus.ww\config.xml"
    Run installation program as 32-bit process on 64-bit clients. Checked
    Install behavior Install for system

    Because we combined multiple products into one installation source, Office Setup does not automatically know which product we want to install. The /config switch and its argument provide this information to Setup so that the user is not prompted.

  7. Click Next, and verify that the settings are correct.
  8. Click Close to exit the wizard.

Double-click the newly-created Application object to open it. Now we’ll change additional settings that weren’t available in the wizard.

  1. On the General tab, check the Allow this application to be installed from the Install Application task sequence action without being deployed.
  2. On the Application Catalog tab, next to the Icon label, click Browse… Navigate to the Office installation source folder, and choose setup.exe. Select its only icon as the icon for this Application. Although this setting is on the Application Catalog tab, the icon will also appear in Software Center. This adds a level of professionalism to the Application package and makes Software Center seem more like a well-put-together app store.
  3. On the Deployment Types tab, select the deployment type and click Edit.
  4. On the Content tab, in the Content location box, remove the specific product folder from the path. In this case, that means deleting proplus.ww so that the path is \\fileserver\software$\Microsoft\Office Professional Plus 2016 (32-bit)\. (Configuration Manager used the longer path because we initially pointed it to the MSI file, but we really need the whole folder structure.)
  5. On the Programs tab, type the following into the Uninstall program text box:
  6. On the Requirements tab, add the system requirements we obtained in the Overview and Prerequisites.
    Requirement Type Operator Values
    CPU speed Greater than or equal to 1000 MHz
    Total physical memory Greater than or equal to 2000 MB
    Free Disk Space of system drive Greater than or equal to 3000 MB
    Operating system One of Windows 7 SP1 (64-bit), Windows 7 SP1 (32-bit), Windows Server 2008 R2 SP1 (64-bit), All Windows 8 (64-bit), All Windows 8 (32-bit), Windows Server 2012, All Windows 8.1 (64-bit), All Windows 8.1 (32-bit), Windows Server 2012 R2, Windows 10
    OS Installation Type Not equal to Server Core
    Internet Explorer Version Begins with 11.
    (Note that the period is included in the value: “11.”)
  7. On the Dependencies tab, add a dependency group with the name .NET Framework 3.5, and add the 32-bit deployment types from the Microsoft .NET Framework 3.5 Application package that we created earlier. That should be nine deployment types: two each (32-bit and 64-bit) for Windows 10 v1511, 10 Release, 8.1/2012 R2, and 8/Server 2012; and one for all bitnesses of Windows 7/Server 2008 R2.
  8. Add a dependency group with the name .NET Framework 4.x, and add both deployment types from the Microsoft .NET Framework 4.5.2 or higher application package that we created earlier.
  9. Add a dependency group with the name Report Viewer, and add the single deployment type for the Microsoft Report Viewer Redistributable 2008 Application that we created earlier.
  10. Click OK until you have dismissed the Application’s Properties window.

Congratulations! Now you have an Office 2016 application package suitable for deploying during operating system deployment with a task sequence. Unfortunately, all the work we have done up to this point is still not quite enough to have a reliable deployment of Office on existing computers with a previous version of Office already installed. Do not–I repeat, DO NOT–deploy this application package to your whole company. If you do, you will have a bad time. Why? See my previous post on removing old versions for the answer. For now, you can go ahead and use this application in new deployments, but you’ll have to tune in next time to get the solution for existing installations.

Other Programs in the Office Family

You can follow the same general procedure to package the other Microsoft Office-family products we included in our source folder structure. Make a separate Configuration Manager Application for Visio and Project Standard. Include all of the same system requirements and dependencies except for Report Viewer which can be omitted.

Coming Up

The next post is the last one in the series on deploying Microsoft Office 2016. In it, I will explain how to use everything we’ve built to provide a reliable delivery of Office 2016 in your organization regardless of whether an existing Office installation is present.

<update date=”2017-07-11″>Corrected HTML encoding errors in code samples.</update>

Deploying Microsoft Office 2016: Customizing Setup

It’s finally time to work on the actual Office installation. We’ve spent several weeks preparing prerequisites, but now it’s time to get down to business. We’ll assemble all of the needed components, and then next time, we’ll will build our application packages and task sequences in Configuration Manager.

Acquiring the Installation Files

As I stated in the overview, my organization has licensed Microsoft Office Professional Plus 2016. Note that this is not the same thing as “Office 365 ProPlus“, which is a subscription plan. The former is packaged the same way as the previous three versions—as a collection of MSI packages coordinated by an executable installer. The latter is delivered via a streaming model. I will be addressing the former.

My organization has also licensed Microsoft Visio Professional 2016 and Microsoft Project Standard 2016. Since these two products are considered part of the Office family of applications even though they are packaged and licensed separately, there is some overlap in their installation files and those of Office Professional Plus. We’ll take advantage of this to build a single installation source for Configuration Manager, thus decreasing the amount of disk space and network bandwidth required to install all three products. (Machines that don’t have all three installed will still get the entire payload in their Configuration Manager caches, but in my environment, it makes sense to bundle them.)

  1. Download the ISO files from the Microsoft Volume Licensing Service Center. I downloaded both 32-bit and 64-bit media, so my files were:
    • SW_DVD5_Office_Professional_Plus_2016_64Bit_English_MLF_X20-42432.ISO
    • SW_DVD5_Office_Professional_Plus_2016_W32_English_MLF_X20-41353.ISO
    • SW_DVD5_Project_2016_64Bit_English_MLF_X20-42644.ISO
    • SW_DVD5_Project_2016_W32_English_MLF_X20-41488.ISO
    • SW_DVD5_Visio_Pro_2016_64Bit_English_MLF_X20-42764.ISO
    • SW_DVD5_Visio_Pro_2016_W32_English_MLF_X20-41585.ISO
  2. On your application staging file share (wherever you put application source files for Configuration Manager to find), create a folder for the Office, Project, and Visio installation sources. Mine will be \\fileserver\software$\Microsoft\Office Professional Plus 2016 (32-bit).
  3. Mount 32-bit Office ISO in Windows File Explorer by double-clicking it.
  4. Run the following commands to copy the ISO content to your installation source folder, checking the log file afterward to ensure that all files were copied successfully:
    rem Change the path to match your installation source.
    set OFFICEFOLDER=\\fileserver\software$\Microsoft\Office Professional Plus 2016 (32-bit)
    
    rem Change the path to the root of the drive where the ISO is mounted
    set ISODRIVEROOT=D:\
    
    robocopy %ISODRIVEROOT% "%OFFICEFOLDER%" /E /XJ /COPY:DAT /DCOPY:DAT LOG:"%OFFICEFOLDER%\OfficeCopyLog.txt"
  5. Eject the Office ISO image, and mount the 32-bit Project ISO.
  6. Run the following command to copy the ISO content to your installation source folder. The /XC, /XN, and /XO switches prevent Robocopy from overwriting any existing files in the destination.
    robocopy %ISODRIVEROOT% "%OFFICEFOLDER%" /E /XJ /COPY:DAT /DCOPY:DAT /XC /XN /XO /LOG:"%OFFICEFOLDER%\ProjectCopyLog.txt"
  7. Eject the Project ISO image, and mount the 32-bit Visio ISO.
  8. Run the following commands to copy the ISO content to your installation source folder.
    robocopy %ISODRIVEROOT% "%OFFICEFOLDER%" /E /XJ /COPY:DAT /DCOPY:DAT /XC /XN /XO /LOG:"%OFFICEFOLDER%\VisioCopyLog.txt"
  9. Repeat steps 2 through 8 for the 64-bit ISOs, copying their contents into a separate installation source folder. Mine will be \\fileserver\software$\Microsoft\Office Professional Plus 2016 (64-bit).
  10. Download the Office 2016 Administrative Template files (ADMX/ADML) and Office Customization Tool from the Microsoft Download Center. These were released after Office, Project, and Visio, and so contain updated versions of the included files.
  11. Run the two downloaded executables to extract the files.
  12. Run the following commands to copy the ISO content to your installation source folder. Note that for product installation, we are only interested in the admin folder.
    rem Change this to the location where you extracted the 32-bit Office Customization Tool files
    set OCTSOURCE=E:\Downloads\Microsoft Office 2016 Administrative Template files (ADMX_ADML) and Office Customization Tool 32-bit (2015-10-21)\admin
    
    robocopy "%OCTSOURCE%" "%OFFICEFOLDER%\admin" /E /XJ /COPY:DAT /DCOPY:DAT /XC /XO /LOG:"%OFFICEFOLDER%\AdminCopyLog.txt"
  13. Repeat step 12 for the 64-bit Office Customization Tool and the 64-bit installation source admin folder.

Customize Setup with the Office Customization Tool

We’re going to use the Office Customization Tool to make our Office installations silent and to tweak a few settings. It looks like Microsoft has not revised its documentation for OCT in Office 2016, so please review a little bit of the Office Customization Tool (OCT) reference for Office 2013 if you are unfamiliar with the tool. I will take a step-by-step approach, though, so if you are new to OCT, you should still be able to follow along.

As I mentioned in the overview, my approach to application packaging is to make the installation silent so that it can be deployed with or without user interaction and to minimize or preferably eliminate first-run prompts wherever possible. For example, people that have been using Microsoft Office for years do not want to watch a video about Office or sign in with a Microsoft Account when their version of Office is upgraded; they just want it to work and not get in their way. On the other hand, as a system administrator, I don’t ever want to be too heavy-handed or nitpicky in application of custom settings because unexpected changes to default settings could be surprising or frustrating to users. I want to give users an experience as close as possible to the out-of-box experience designed by Microsoft without compromising the no-first-run-pop-ups rule. You can customize almost any setting in Office by using the Office customization tool, but don’t do it! Most organization-specific setting customizations belong in Group Policy, not in the installation program.

Open an administrative Command Prompt window and run the Office setup program with the /admin switch:

"\\fileserver\software$\Microsoft\Office Professional Plus 2016 (32-bit)\setup.exe" /admin

The Microsoft Office Customization Tool window will open and prompt you to select a product. Office, Project, and Visio should be listed. Choose to create a new Setup customization file for Office.

32-bit Office

Here are the settings that I used. These settings eliminate most first-run pop-ups. Also, since my organization uses Microsoft Exchange, Outlook will be able to figure out the account settings for the signed-in user automatically, so I include a setting that tells it to just do that and not bother the user with the new account wizard. As is the case with most installers, specifying a silent installation is not enough to prevent a reboot, so a Setup property is specified to make that intention clear. (See Setup properties reference for Office 2013; again, we’re relying on some 2013 documentation because there is no updated version for 2016.)

Setup section
Install location and organization name Leave the default installation path.

Type your organization’s name in the appropriate box.

Licensing and user interface Ensure that Use KMS client key is selected. (This is the default.)

Ensure that the I accept the terms in the License Agreement checkbox is checked.

Set the display level to None. Then ensure that the subsequent checkboxes have the following states:

  • Completion notice –  not checked (the default once display level is set to None)
  • Suppress modal – checked
  • No cancel – not checked (the default)
 Modify Setup properties  Add the property name SETUP_REBOOT (all capital letters) with the value Never (first letter only capitalized).
Features section
Modify user settings Ensure that the Migrate user settings checkbox is checked.

Configure the following settings:

  • Microsoft Office 2016
    • Privacy
      • Trust Center
        • Disable Opt-in Wizard on first run – Enabled
          The Opt-in Wizard is a first-run prompt that allows users to opt into Internet-based services like MS Update, CEIP, Office Diagnostics, & online help.
        • Automatically receive small updates to improve reliability – Enabled
    • First Run
      • Disable First Run Movie – Enabled
      • Disable Office First Run on application boot – Enabled.
  • Microsoft Outlook 2016
    • Account Settings
      • Exchange
        • Automatically configure profile based on Active Directory Primary SMTP address – Enabled
          Outlook knows all of the right answers for the account setup wizard; this setting prevents the user from having to click next Next-Next-Next-Finish. Instead, it just works.
Set feature installation states Set the root node to Run all from my computer.
Regardless of feature installation settings, everything is copied to disk no matter what. The whole thing is there, and we paid for it, so let’s turn it all on so that people can use it without any hassle.
Additional content section
Add registry entries  Add a registry entry under HKLM to tag installations of Office with an easy-to-read marker denoting this Setup customization file. I use a registry key with my organization’s name and a value that contains the customization file’s name.

For example:

  • Root: HKEY_LOCAL_MACHINE
  • Data type: REG_SZ
  • Key: SOFTWARE\Generic Midwestern University
  • Value name: Office Customization Tool Patch – ProPlus 2016-x86
  • Value data: OCT-ProPlus2016-x86-Silent-Install-2016-02-15

That last item is just my personal preference and is completely optional. I thought it might come in handy at some point in the future to be able to easily tell whether a given Office installation had been installed using my customization file.

Save the customization file to the root of the Office installation source folder. (It should be in the same location as setup.exe.) It is saved as a Windows Installer patch file (MSP). I use the following formula for naming the customization file; a hyphen separates the individual pieces of information:

  • “OCT” for “Office Customization Tool”
  • Product name based on its folder name in the installation source (e.g., ProPlus), followed by the version under which it is marketed (e.g., 2016)
  • CPU platform (i.e., x86 or x64)
  • “Silent-Install” to indicate that the installation requires no user interaction
  • The date the customization was created in yyyy-mm-dd format.

Following this naming scheme, the filename for the customization we just built is OCT-ProPlus2016-x86-Silent-Install-2016-02-15.MSP. This, of course, matches the registry value I added.

Project, Visio, and 64-bit Versions of Everything

You will need to create new customization files for each of the other two products. All of my settings for Project and Visio are identical to those for Office with the following exceptions:

  • There are obviously no Outlook 2016 settings.
  • The added registry value will reflect the name of its own customization file.

Then, when that is done, you can move to your 64-bit Office installation source folder and create three more customization files for 64-bit versions of Office, Project, and Visio. Don’t mix the bitness of customization files and installation files. You must use the 64-bit setup.exe program to build 64-bit customization files, and you must use the 32-bit setup.exe program to build 32-bit customization files. You cannot use the same customization file for both the 32-bit and 64-bit versions of a product. You can, however, import a 32-bit customization file for a given product into the 64-bit OCT and then resave it as a 64-bit customization file for that same product, and vice versa.

When you are done, you should have six customization files. Mine are:

  • OCT-ProPlus2016-x86-Silent-Install-2016-02-15.MSP
  • OCT-VisPro2016-x86-Silent-Install-2016-02-15.MSP
  • OCT-PrjStd2016-x86-Silent-Install-2016-02-15.MSP
  • OCT-ProPlus2016-x64-Silent-Install-2016-02-15.MSP
  • OCT-VisPro2016-x64-Silent-Install-2016-02-15.MSP
  • OCT-PrjStd2016-x64-Silent-Install-2016-02-15.MSP

Testing Installation

My instructions above specified saving the customization files in the root of the Office installation source folder rather than in the Updates folder. If the customization files were in the Updates folder, they would be applied automatically during any installation. The problem is that only one customization for a given product can exist in the Updates folder. That’s fine for now; we only built a single customization file for each product. If I wanted to support multiple installations from a single installation source, though, this would not work. For example, suppose most users are served well by the installations described above, but for some business reason, some computers can only have Microsoft Word installed. If the customization files were in the Updates folder, I could not reuse this installation source; instead, I would have to have a separate copy of the complete Office installation files. That is clearly ridiculous, and so I planned ahead in case something like that happens by saving the customization files outside of the Updates folder. The consequence of that decision is that I must be explicit about which customization file when running setup. That will be our first command-line argument.

The second command-line argument will tell Setup which product to install. Since there is one setup.exe file in a folder structure of three products, Setup will prompt for which product to install unless we tell it on the command line in advance. To specify the product to install, we must point setup.exe to the config.xml file for the desired product. This file is located in the folder named after the product.

To get a full description of the command line parameters available, run setup.exe /?. Here are the commands to silently install the 32-bit versions of our three products:

rem The following command lines assume that the current directory is the installation source folder.

rem Office
setup.exe /adminfile "OCT-ProPlus2016-x86-Silent-Install-2016-02-15.MSP" /config "proplus.ww\config.xml"

rem Project
setup.exe /adminfile "OCT-PrjStd2016-x86-Silent-Install-2016-02-15.MSP" /config "prjstd.ww\config.xml"

rem Visio
setup.exe /adminfile "OCT-VisPro2016-x86-Silent-Install-2016-02-15.MSP" /config "vispro.ww\config.xml"

Coming Up

Next time, we’ll revisit the .NET prerequisites.

<update date=”2016-02-20″>Added setting the SETUP_REBOOT property to “Never”.</update>

<update date=”2016-04-17″>Revised the “Coming Up” section for accuracy.</update>

Deploying Microsoft Office 2016: Removing Old Versions

For the last few weeks, we’ve been building application packages to serve as prerequisites for Office 2016 installation. Today, we’ll tackle one last preparatory issue before actually constructing the Office 2016 Application in Configuration Manager.

As we’ll see next week, Office 2016 has numerous options that can be set at installation time. One of these options instructs the Office Setup program to uninstall previous versions of Office before beginning the installation process. This is great because having multiple versions of Office installed just doesn’t work in several combinations, and in others, it is supported but not recommended. See Install and use different versions of Office on the same PC for links to additional details.

Unfortunately, this fantastic feature of the Office setup program doesn’t actually work! During setup, if the currently installed (old) version of Office contains a program (e.g., SharePoint Designer 2010) that has been eliminated from the product in the current version, the setup program can’t remove it. Also, if the existing installation is damaged in some way, it may not be able to be uninstalled reliably. Therefore, if we want a clean upgrade experience for existing installations, we have to find another method to remove previous versions of Office.

The Office Deployment Support Team Blog provides the answer. In the post, How to uninstall Office 2010 and move to Office 2013 (Click to Run or Volume License), the author writes:

Utilizing Offscrub is the best method of removing a previous version of Office. It will call setup.exe and MSIExec to remove the bits. It is best equipped to deal with machine or software corruption and completely removes Office app shortcuts for the previous version. We recommend using Offscrub in almost every situation of moving from Office 2010 to Office 2013.

What is this “OffScrub” program? OffScrub is the underlying VBScript program that runs when you download and run a Microsoft FixIt program to remove Office. We’re going to follow the Office Deployment Support Blog’s suggestion and use this technology to reliably remove all previous versions of Office back to Office 2003 before installing Office 2016. Let’s get started.

Acquiring the Script Files

I am going to walk through all of the steps below, but you may want to take a moment to go read How to obtain and use Offscrub to automate the uninstallation of Office products from the Office Deployment Support Blog. That is a major source for this post.

Download the FixIt Programs

Let me save you some time. I downloaded seven separate FixIt files for various versions of Office and Windows. For each version of Office, one package is available for Windows 7 and lower, and another package is available for Windows 8 and higher. It turns out that the OffScrub*.vbs file is the same in both packages. (There is one exception: The Windows 7 Offscrub03.vbs for Office 2003 is missing one of the subroutines that it calls—a bug—but the subroutine exists in the Windows 8 version.) Therefore, you will only have to download four FixIt files. We’ll use the Windows 8 versions because they are easier to extract and don’t have the bug mentioned above.

  1. Browse to the Microsoft Support article, How to uninstall Office 2003, Office 2007 or Office 2010 suites if you cannot uninstall it from Control Panel.
  2. Download each of the FixIt programs available on that page for Windows 8. Save them in folders named for the year of the Office version followed by a hyphen and the applicable OS platforms:
    • 2003-Win8
    • 2007-Win8
    • 2010-Win8

    Note: There is a FixIt listed separately for Office 2010 on Windows 10 in the Office Support article, Uninstall or remove Office 2010. As with the Windows 7 version, this FixIt is the same as the one listed here for Windows 8.

  3. Browse to Uninstall Office 2013, Office 2016, or Office 365 from a Windows computer.
  4. Download the “easy fix tool” into a folder named “2013-2016-O365-Win”.

I wanted to show you where all of the files came from, but for reference, here are direct links to all of them:

Windows 7 & earlier
(Shaded links aren’t needed for this blog post.)
Windows 8 Windows 10
Office 2003 MicrosoftEasyFix50416.msi MicrosoftFixit20054.mini.diagcab No FixIt available
Office 2007 MicrosoftEasyFix50154.msi MicrosoftFixit20052.mini.diagcab  No FixIt available
Office 2010 MicrosoftEasyFix50450.msi MicrosoftFixit20055.mini.diagcab
Office 2013/2016 O15CTRRemove.diagcab

Based on the fact that the Office 2010 FixIt files are the same for Windows 10 and all other Windows versions, I am going to assume that the same is true for Office 2003 and 2007.

Extract the OffScrub Scripts

Now we must depart a bit from our instructions, which predate the release of Windows 8. The FixIt programs we downloaded are packaged in DIAGCAB files. DIAGCAB files work with the Windows Troubleshooting Platform, but architecturally, they are just CAB files, so we can extract their contents with the expand command.

On your application staging file share (wherever you put application source files for Configuration Manager to find), create a folder structure for the OffScrub scripts. Mine will be \\fileserver\software$\Microsoft\OffScrub with a subfolder for each Office version. Make the appropriate changes for your environment in the commands below, and then run them.

rem Change the path to match the parent of all of the folders created earlier.
rem This can also be a network path, like \\server\share\OffScrubDownloads
set OFFSCRUBSOURCE=E:\OffScrubDownloads
set OFC2003WIN8=%OFFSCRUBSOURCE%\2003-Win8
set OFC2007WIN8=%OFFSCRUBSOURCE%\2007-Win8
set OFC2010WIN8=%OFFSCRUBSOURCE%\2010-Win8
set OFC20132016=%OFFSCRUBSOURCE%\2013-2016-O365-Win

rem Change the path to match your Configuration Manager application source location.
set OFFSCRUBDESTINATION=\\fileserver\software$\Microsoft\OffScrub
md "%OFFSCRUBDESTINATION%\2003"
md "%OFFSCRUBDESTINATION%\2007"
md "%OFFSCRUBDESTINATION%\2010"
md "%OFFSCRUBDESTINATION%\2013"
md "%OFFSCRUBDESTINATION%\2016"
md "%OFFSCRUBDESTINATION%\C2R"

rem Use the EXPAND command to extract the OffScrub files (-f) from the DIAGCAB files, which are really just CAB files with specialized contents, and disregard internal folder structure (-i).
expand -i "%OFC2003WIN8%\MicrosoftFixit20054.mini.diagcab" -f:OffScrub*.vbs "%OFFSCRUBDESTINATION%\2003"
expand -i "%OFC2007WIN8%\MicrosoftFixit20052.mini.diagcab" -f:OffScrub*.vbs "%OFFSCRUBDESTINATION%\2007"
expand -i "%OFC2010WIN8%\MicrosoftFixit20055.mini.diagcab" -f:OffScrub*.vbs "%OFFSCRUBDESTINATION%\2010"
expand -i "%OFC20132016%\O15CTRRemove.diagcab" -f:OffScrub*.vbs "%OFFSCRUBDESTINATION%\2013"
move /y "%OFFSCRUBDESTINATION%\2013\OffScrub_O16msi.vbs" "%OFFSCRUBDESTINATION%\2016"
move /y "%OFFSCRUBDESTINATION%\2013\OffScrubc2r.vbs" "%OFFSCRUBDESTINATION%\C2R"

The expand commands above extract just the VBS files that we need from the DIAGCAB files.

Update from 2016-04-03

Subsequent to this blog post’s initial publication, testing showed that while all of the extracted scripts work correctly when run manually, they fail on 64-bit Windows when run from inside a Configuration Manager Package. It turns out that even in Configuration Manager v1511, the engine that executes package programs is run in a 32-bit process on 64-bit Windows. That means that calls to cscript.exe on 64-bit Windows will use the SysWOW64 version of cscript.exe and will get the special modified view of the system provided for 32-bit processes. This prevents the scripts from adequately searching through the entire system and effectively removing Office programs. I added the following section to deal with this issue.

Overriding the File System Redirector

In order to work properly, the Offscrub scripts must all run in the native bitness of the platform. On 64-bit Windows, that means we must directly call the native cscript.exe program when running from within a Configuration Manager Package. In order to keep the package programs platform neutral, I wrote a small script to use in place of cscript.exe that figures out which cscript.exe to call, and then does so. I am indebted to Andrew Lukaszewski, whose generic script to overcome this issue inspired the more specific script below.

Copy the following into a plain ANSI text file and save it as CScriptNative.cmd in the root of the Offscrub folder structure. (Mine is \\fileserver\software$\Microsoft\OffScrub\CScriptNative.cmd.)

@echo off
rem CScriptNative.cmd
rem Author: Jay Michaud (www.deploymentmadscientist.com)
rem Date: 2016-03-02
rem Source: http://www.deploymentmadscientist.com/2016/02/08/deploying-microsoft-office-2016-removing-old-versions/
rem Acknowledgement: Inspired by Andrew Lukaszewski's blog at https://madluka.wordpress.com/2012/09/24/configmgr-2012-64bit-file-system-redirection-bites-again/
rem Description: Use this command script in place of cscript.exe to ensure that the script runs as a 64-bit process on 64-bit operating systems.
rem This is useful when deploying a script as a package program in Microsoft System Center Configuration Manager, where the engine that runs the package program is a 32-bit process on 64-bit Windows.
rem Example: Instead of
rem cscript.exe //B //NoLogo "\\server\share\path\to\my script.vbs"
rem run
rem NativeCScript //B //NoLogo "\\server\share\path\to\my script.vbs"

rem On 32-bit Windows, the PROCESSOR_ARCHITEW6432 environment variable is not defined by the operating system.
rem On 64-bit Windows, the PROCESSOR_ARCHITEW6432 environment variable is not defined by the operating system in 64-bit processes.
rem On 64-bit Windows, the PROCESSOR_ARCHITEW6432 environment variable is defined by the operating system in 32-bit processes as "AMD64" (without quotation marks).

if "%PROCESSOR_ARCHITEW6432%"=="AMD64" (
rem Currently running as 32-bit process on 64-bit Windows (SysWOW64)
rem Launch CScript through Sysnative
"%SystemRoot%\Sysnative\cscript.exe" %*
) else (
"%SystemRoot%\System32\cscript.exe" %*
)

If the script detects that it is running in a 32-bit process on 64-bit Windows, it calls the 64-bit cscript.exe directly, bypassing the File System Redirector, by calling "%SystemRoot%\Sysnative\cscript.exe". Otherwise, it calls the native cscript.exe located in the System32 folder.

Building the Configuration Manager Package

In the previous blog posts in this series, I have been using the phrase “application package” and the word “Application” (capitalized) interchangeably to refer to an Application object in Configuration Manager. Because the OffScrub VBS scripts perform a task and don’t actually install anything, an Application will not work. Instead, we will build a single Configuration Manager Package to hold all of the scripts.

Please consult the TechNet documentation for assistance in building a ConfigMgr Package: Packages and programs in System Center Configuration Manager. Here are the specifics.

Property Value
Package Properties
Name Microsoft OffScrub
Description Collection of program removal scripts for Office 2003, 2007, 2010, 2013, 2016, and Office 365 from Microsoft PSS.
Manufacturer Microsoft
Language Leave blank
Version Leave blank
 This package contains source files Checked
Source folder \\fileserver\software$\Microsoft\OffScrub
Standard Program Properties – Office 2003
Name OffScrub03
Command line "%SystemRoot%\System32\cmd.exe" /C "CScriptNative.cmd //B //NoLogo "2003\OffScrub03.vbs" ALL /Quiet /NoCancel /Force /OSE"
Startup folder Leave blank
Run Hidden
Program can run Whether or not a user is logged on
Run mode Run with administrative rights (selection is disabled)
Allow users to view and interact with the program installation Unchecked
Drive mode Runs with UNC name
 Run another program first Unchecked
 This program can run only on specified platforms On any platform

Note that these scripts will only run on Windows, but in my environment, the 32-bit versions of Windows 8 and 8.1 are not present in this list, so I could not use this list to filter where this package would appear. I do not know if their absence is a bug in Configuration Manager or a problem with my organization’s ConfigMgr environment. In any case, I need these scripts to run on 32-bit Windows, so I must specify “On any platform” in order to have the above-mentioned platforms included.

Estimated disk space 146 KB
Maximum allowed run time (minutes) 120 (the default)

All of the scripts names are unique, so they all could have been placed into the same folder. Putting each script into its own folder allows this package to grow easily in the future even if Microsoft releases an OffScrub script with the same name as an existing one.

The Run, Program can run, and Run mode properties indicate silent installation and are typical for programs that need to be deployed as “required” or in a task sequence. My plan is to deploy this in a task sequence.

The command line deserves some explanation. Our instructions recommend not using the Force switch because it can cause users to lose data. I looked at the source code of the command line argument handling and the declarations of the flags that are set by those arguments. The reason for that warning is that the Force switch causes the Office programs to exit if they are running, presumably without allowing the user to save his/her data. Because I am planning to deploy this only in a task sequence, I will include a reboot step prior to running any OffScrub scripts; that will prevent any user from having an Office application running when the script starts.

Our instructions further recommend that we bypass stage 1 (/Bypass 1) when automating Office uninstallation because it can trigger repairs in some products. I took a look at the source code to see what stage 1 actually accomplishes, but I didn’t get very far because I noticed that if the Force switch is passed, the Bypass switch is ignored for stage 1. Since I am passing the Force switch to ensure a complete uninstallation, there is no point in passing the Bypass switch just to have it be ignored.

Each of these scripts automatically logs several different files of output to %TEMP% without any need to specify the /Log switch. While you are testing this package, check there to see if anything is going awry.

The rest of the programs are nearly identical to the first one we built above. I will list below only the properties that differ. Set all other properties to the same values as those in the Office 2003 program.

Property Value
Standard Program Properties – Office 2007
Name OffScrub07
Command line "%SystemRoot%\System32\cmd.exe" /C "CScriptNative.cmd //B //NoLogo "2007\OffScrub07.vbs" ALL /Quiet /NoCancel /Force /OSE"
Estimated disk space 172 KB
Standard Program Properties – Office 2010
Name OffScrub10
Command line "%SystemRoot%\System32\cmd.exe" /C "CScriptNative.cmd //B //NoLogo "2010\OffScrub10.vbs" ALL /Quiet /NoCancel /Force /OSE"
Estimated disk space 181 KB
Standard Program Properties – Office 2013
Name OffScrubO15
Command line "%SystemRoot%\System32\cmd.exe" /C "CScriptNative.cmd //B //NoLogo "2013\OffScrub_O15msi.vbs" ALL /Quiet /NoCancel /Force /OSE"
Estimated disk space 364 KB
Standard Program Properties – Office 2016
Name OffScrubO16
Command line "%SystemRoot%\System32\cmd.exe" /C "CScriptNative.cmd //B //NoLogo "2016\OffScrub_O16msi.vbs" ALL /Quiet /NoCancel /Force /OSE"
Estimated disk space 363 KB
Standard Program Properties – Office Click to Run
Name OffScrubC2R
Command line "%SystemRoot%\System32\cmd.exe" /C "CScriptNative.cmd //B //NoLogo "C2R\OffScrubc2r.vbs" ALL /Quiet /NoCancel /OSE"

Note: While the C2R script tests an internal fForce flag value, it does not process a /Force switch, so it is omitted here.

Estimated disk space 265 KB

Finally, now that all of the programs are created in the package, we must edit one property not available during program creation. Open each program, and on the Advanced tab, check the Allow this program to be installed from the Install Package task sequence without being deployed box.

We now have a Configuration Manager Package that can remove all traces of any version of Microsoft Office back to 2003.

Coming Up

Next time, we will look at the Office 2016 setup program and how to customize it for silent installation through Configuration Manager.

<update date=”2016-02-21″>Added instruction to allow installation in a task sequence without being deployed.</update>

<update date=”2016-03-03″>Changed paths so that each script has its own folder. Removed /Log switch from all scripts because they all log to %TEMP% by default. Added warnings about failure on 64-bit operating systems.</update>

<update date=”2016-04-03″>Removed 64-bit warnings. Added “Overriding the File System Redirector” section and updated program command lines to use CScriptNative.cmd instead of cscript.exe.</update>

Deploying Microsoft Office 2016: Overview and Prerequisites

I work for a large university in the midwestern United States, where part of my job is building operating system images and application packages for deployment with Microsoft System Center Configuration Manager. It is a lot of work to plan and build a high-quality, reliable deployment, and so I thought I would start my blog by documenting the process of building a set of Configuration Manager application packages for the latest version of one of the most commonly deployed applications on the planet: Microsoft Office. Numerous blogs have helped me to do my job, and it is my hope that this blog will be a worthy gift back to the online software deployment community.

Although Microsoft Office 2016 has been available for several months, there has not been an outcry for upgrades in my organization. We avoid making changes while classes are in session, so major upgrades tend to be scheduled in the downtime between the summer and fall semesters. I suspect, therefore, that the university will move to the new version in summer 2016, which gives me the time to document the required planning and testing here. We have licensed Microsoft Office Professional Plus 2016; we are not using the Office 365 offering.

Application Packaging Guidelines

Goal: Build a reliable Microsoft Office Professional Plus 2016 application package in System Center Configuration Manager for deployment across multiple operating system versions.

I will explain my philosophy of application packaging and deployment fully in a later post, but for now, I will just list these brief rules for applications deployed through Configuration Manager’s Software Center:

  • Installation must be silent.
  • The application package must account for all possible dependencies.
  • The installation must be reversible.
  • First-run prompts must be minimized or preferably eliminated.

Hardware Requirements and Prerequisite Software

Let’s start by taking a look at the System requirements for Office 2016. This will tell us the hardware requirements, which we will need later when building our application package, and any prerequisite software. We must either test for the presence of prerequisite software or build separate application packages for that software. My university has licensed Office Professional Plus, so I will focus on that edition’s requirements. Here they are:

From <https://products.office.com/en-us/office-system-requirements>
COMPONENT REQUIREMENT
Computer and processor 1 gigahertz (GHz) or faster x86-bit or x64-bit processor with SSE2 instruction set
Memory 2 GB RAM
Hard disk 3.0 GB available disk space
Display 1280 x 800 screen resolution
Graphics Graphics hardware acceleration requires a DirectX 10 graphics card.
Operating system
Windows 10, Windows 8.1, Windows 8, Windows 7 Service Pack 1, Windows 10 Server, Windows Server 2012 R2, Windows Server 2012, or Windows Server 2008 R2
For the best experience, use the latest version of any operating system.
Browser The current or immediately previous version of Internet Explorer; the current version of Microsoft Edge, Safari, Chrome, or Firefox.
.NET version
.NET 3.5 required. Some features may require .NET 4.0, 4.5, or 4.6 CLR to also be installed.
Other Internet functionality requires an Internet connection. Fees may apply.
A touch-enabled device is required to use any multi-touch functionality. But, all features and functionality are always available by using a keyboard, mouse, or other standard or accessible input device. Note that touch features are optimized for use with Windows 8, Windows 8.1 or Windows 10.
Product functionality and graphics may vary based on your system configuration. Some features may require additional or advanced hardware or server connectivity.

I highlighted the portions that interest me right now; we’ll come back to the hardware requirements later.

At my university, there is little top-down direction regarding which operating system version should be used, and so I must plan to support all of the listed operating systems in order for my application package to be useful to the entire organization. Unfortunately, that means I have to ensure compatibility with ten client operating systems and three server operating systems:

  • Windows 7 SP1 (huge installed base in my organization) (64-bit and 32-bit)
  • Windows 8 (hopefully no one is running this, but we need to support it anyway) (64-bit and 32-bit)
  • Windows 8.1 (small installed base in my organization) (64-bit and 32-bit)
  • Windows 10 RTM (hopefully no one is running this, but we need to support it anyway) (64-bit and 32-bit)
  • Windows 10 November Update v1511 (small installed base, but our platform of choice for all new installations and reinstallations beginning in summer 2016) (64-bit and 32-bit)
  • Windows Server 2008 R2
  • Windows Server 2012
  • Windows Server 2012 R2

I only worry about software that has actually been released, so the next version of Windows Server is irrelevant at the time of this writing. Also, yes, I know that installing Office on Windows Server is a terrible idea, but Microsoft supports it, so my application package will support it.

You may be wondering why I am so concerned about the operating systems when the Office team has taken care of operating system support. The answer lies in the prerequisites. The various versions of the .NET Framework are installed differently on different operating systems. Each of the required .NET Framework versions must have its own application package in Configuration Manager to act as a prerequisite to the main Office 2016 package. I will cover building the .NET application packages in future posts.

Browser support is less of an issue. Windows 10, 8.1, and Server 2012 R2 have Internet Explorer 11 built in; Windows 8 and Server 2012 have Internet Explorer 10 built in. Both of these IE versions satisfy the requirements. For Windows 7 and Server 2008 R2, we’ll either have to build an IE11 application package or set a condition that checks for IE10 or IE11. My initial thought is to just set a condition because if any Windows installation is on an old version of IE at this point (January 2016), then the user or administrator has specifically blocked it from being installed in Windows Update as well as in the settings of IE itself, and so we should respect that decision and just fail the Office installation. (If I change my mind about this, you’ll find out in a future post.)

Coming Up

The .NET Framework packages are large and complex. They are also applicable to other applications besides Office, so I will cover them first. Next time, we’ll build a single .NET Framework 3.5 SP1 package that works for all 13 platforms listed above. After that, we’ll build a .NET 4.6.1 package. Finally, because Office’s .NET 4.x version requirement is flexible—any version that starts with ‘4’ is OK—we’ll build a package that does the minimum amount of work for a given platform in order to satisfy that requirement, and we will make use of the .NET 4.6.1 package source for platforms that don’t have .NET 4.x included as an OS component.